Creating and Managing Accounts
The Workbench and MCP server support built-in authentication via two methods:
- User accounts provide interactive authentication for users. When a user authenticates successfully, the server assigns a session token. The token allows the user to remain connected until the session ends.
- Service accounts allow automated, programmatic access to the API via direct HTTP/HTTPS connections with authentication managed by API tokens. A service account cannot log in with a password. A service account can be a superuser or a member of groups, with RBAC privileges managed like login users. The server rejects password-based login for service accounts.
Authentication data is stored in a SQLite database (auth.db) within the
data directory. By default, the database resides at ./data/auth.db
relative to the server binary.
The following table describes the database tables used to manage account, permissions, and authentication details:
| Table | Description |
|---|---|
users |
Stores usernames, bcrypt password hashes, service account flags, and superuser status. |
tokens |
Stores API token hashes, expiry dates, and owner references for all token types. |
groups |
Stores named groups for organizing users and assigning permissions. |
group_members |
Tracks user and nested group memberships within each group. |
token_scope |
Restricts tokens to specific connections, MCP privileges, and admin permissions. |
Adding a User or Service Account
A User account authenticates with a username and password to receive a 24-hour session token. A Service account provides programmatic access authenticated via an API token; it is intended for use by computer programs and client applications.
You can add either account type with the Workbench's graphical interface, or at the command line.
To use the Workbench GUI to add an account, select the Settings icon in the
upper-right corner of the Workbench console.
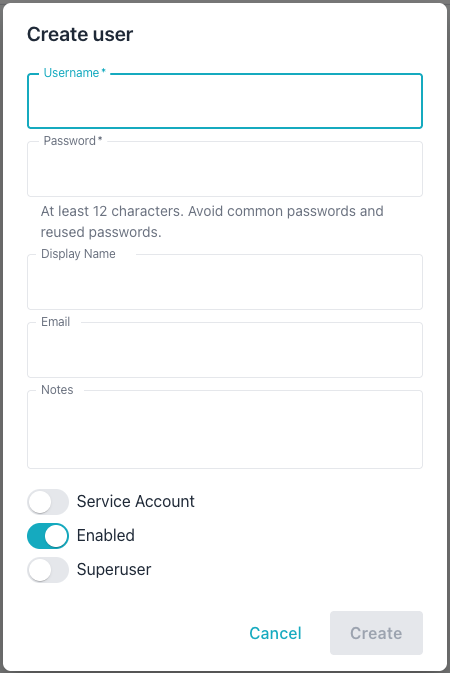
Use the fields on the Create user dialog to define the user; provide:
- the login name for the account in the
Usernamefield. - the password associated with the user in the
Passwordfield. - the name that will be displayed for the user in the
Display Namefield. - the email account associated with the user in the
Emailfield. - any notes relevant to the user account in the
Notesfield.
Toggles at the bottom of the dialog allow you to:
- indicate that the account is intended for programmatic access only by
setting the
Service Accounttoggle toon. EnableorDisablethe account; when disabled, the user cannot log in.- create a
Superuseraccount; setting theSuperusertoggle toonconveys privileges to add managed servers or users.
You can also use the command line to add a user. In the following example,
the -add-user flag starts interactive mode, prompting you for user details:
./bin/ai-dba-server -add-user
In interactive mode, provide the following:
- Username (required)
- Password (hidden input, with confirmation)
- User Email (optional)
- Annotation or note (optional)
Similarly, the -add-service-account flag creates a new service account in
interactive mode:
./bin/ai-dba-server -add-service-account
In interactive mode, provide the following:
- Username (required)
- Full account name (optional)
- Email address for the account (optional)
- Annotation or note (optional)
You can also provide required fields when you use the -add-user flag to
create a user in non-interactive mode:
./bin/ai-dba-server -add-user \
  -username alice \
  -password "SecurePassword123!" \
  -user-note "Alice Smith - Developer"
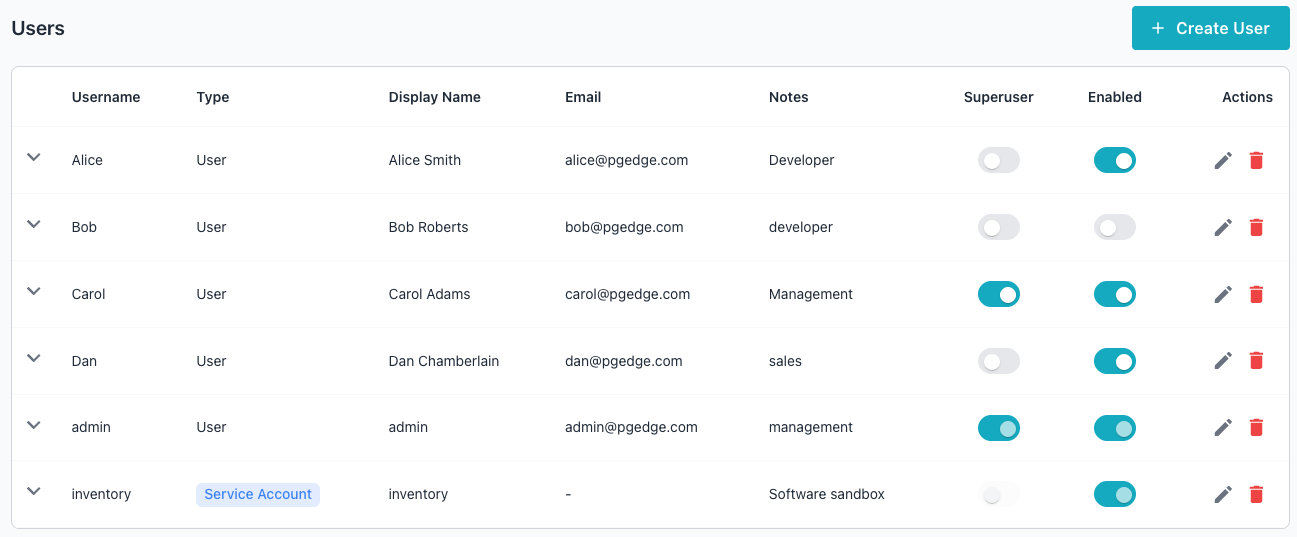
Reviewing a List of Accounts
The Workbench console and command line both provide ways to review existing user and service accounts.
You can review a list of user and service accounts in either the Workbench
console or at the command line. To review the list in the console, select the
Settings icon in the upper-right corner:
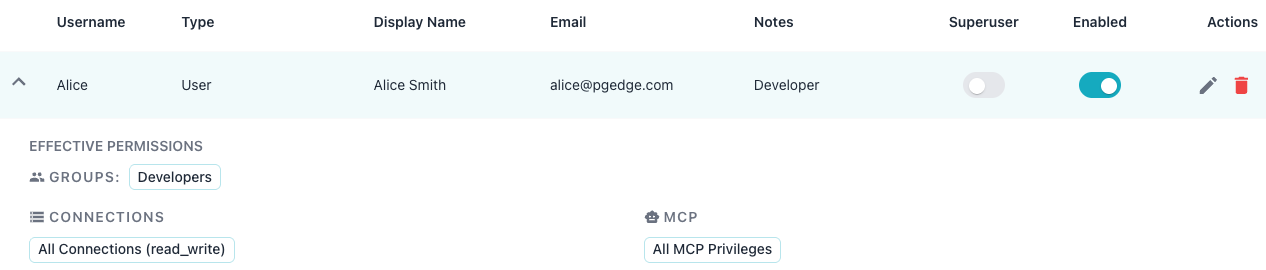
Use the arrow to the left of a Username to review detailed information about the privileges assigned to the user:
You can also include the -list-users flag when invoking the ai-dba-server
command to display a list of user accounts on the command line:
./bin/ai-dba-server -list-user
The user list includes all currently defined user and service accounts:
./bin/ai-dba-server -list-users
Auth store: /var/lib/ai-workbench/data/auth.db

Users:
=========================================================================================
Username             Created                   Last Login           Status     Notes
-----------------------------------------------------------------------------------------
Alice                2026-06-10 13:24          Never                Enabled    Developer
Bob                  2026-06-10 13:31          Never                DISABLED   developer
Carol                2026-06-10 13:32          Never                Enabled    Management
Dan                  2026-06-10 13:37          Never                Enabled    sales
admin                2026-06-09 11:59          2026-06-10 12:27     Enabled    management
inventory            2026-06-10 13:31          Never                Enabled    Software
=========================================================================================
Modifying an Account
The Workbench console and command line both support modifying account properties.
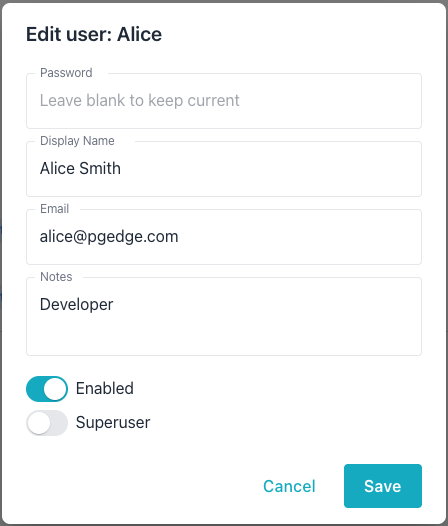
To update the details associated with an account in the console, navigate to
the Users tab and select the edit icon (the pencil) at the far-right of the
account you wish to modify. The Edit user dialog opens, allowing you to
modify:
- the
Passwordassociated with the account. - the
Display Name. - the
Emailassociated with the account. - the
Notesassociated with the account. - if the account is
Enabled. - if the account has
Superuserprivileges.
You can also modify these properties at the command line. In the following
example, the -update-user flag starts an interactive session to modify an
existing user account:
# Interactive update
./bin/ai-dba-server -update-user -username alice
To update an account programmatically, pass the -update-user flag along
with keywords and the new information on the command line; for example:
# Update password from command line (less secure)
./bin/ai-dba-server -update-user \
  -username alice \
  -password "NewPassword456!"

# Update annotation only
./bin/ai-dba-server -update-user \
  -username alice \
  -user-note "Alice Smith - Senior Developer"
Similarly, pass the -disable-user and -enable-user flags to control
whether an account is enabled or disabled:
# Disable a user account (prevents login)
./bin/ai-dba-server -disable-user -username charlie

# Re-enable a user account (also resets failed attempts)
./bin/ai-dba-server -enable-user -username charlie
Deleting an Account
Use the Workbench console or the command line to delete a user or service account.
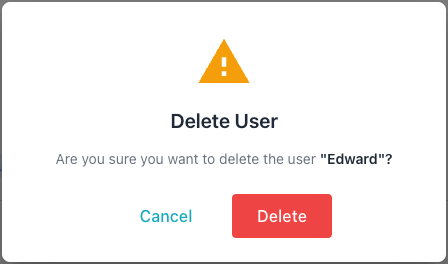
To use the Workbench console to delete a user account, select the Delete
icon (the garbage can) at the far right of an account name. When the popup
opens, confirm that you wish to delete the account by selecting Delete:
You can also delete a user or service account at the command line. In the
following example, the -delete-user flag removes a user account:
# Delete user (with confirmation prompt)
./bin/ai-dba-server -delete-user -username charlie
Managing Rate Limiting and Account Lockout
Rate limiting and account lockout behavior are controlled by authentication
settings in the server configuration file
(/etc/pgedge/ai-dba-server.yaml).
The configuration file manages the following authentication options:
http:
  auth:
    enabled: true
    # Rate limiting settings
    rate_limit_window_minutes: 15
    rate_limit_max_attempts: 10
    # Account lockout settings
    max_failed_attempts_before_lockout: 5  # 0 = disabled
    # API token restrictions
    # Superuser-owned tokens are exempt from this limit
    max_user_token_days: 90  # 0 = unlimited
When a valid user name is provided, the server tracks failed login attempts.
The following settings control lockout behavior:
- The default disables lockout; a value of 0 means no lockout applies.
- The
max_failed_attempts_before_lockoutsetting controls the threshold for locking out an account. - An administrator must re-enable locked accounts until the number of minutes
specified in
rate_limit_window_minutespasses.
You can use the following command to re-enable a locked account and reset the number of failed login attempts:
# Re-enable a locked account (also resets failed attempts)
./bin/ai-dba-server -enable-user -username alice